
In this post, we’ll discuss Allen Test and how to perform Allen Test (AT), Modified Allen Test (MAT), and Reverse Allen Test.
What is Allen Test?
Allen’s test or Allen test (AT) is a simple non-invasive method for assessing the perfusion and patency of the arteries (i.e., radial and ulnar artery) that supply blood to the hand.
Allen’s test was originally described by an American Cardiologist, Edgar Van Nuys Allen in 1929.
Later it was modified in 1952 by Irving S. Wright and this modification is named as Modified Allen Test (MAT). Since then, the original Allen test is almost completely replaced with Modified Allen Test (MAT) in clinical practice. Barbeau test is another variation of the Allen test using pulse oximeter and plethysmography.
Allen test is an important physical examination performed by clinicians. Because this test evaluates the patency of the ulnar artery and its ability to adequately perfuse the hand in the event of injury or damage to the radial artery.

Purpose of Allen Test
- To assess patency of the arteries of the hand.
- To evaluate adequacy of collateral blood circulation of ulnar artery to hand in case of radial artery damage during a procedure or surgery.
Indication for Allen Test
Allen test is indicated before performing certain procedures and surgeries which may harm and block radial artery’s blood circulation. Some examples include:
- Radial artery puncture for arterial blood gases (ABG) sampling
- Cardiac catheterization via transradial approach
- Radial artery catheterization or cannulation
- Wrist surgeries
Factors that affect Modified Allen Test (MAT)
Factors negatively influence the result of the Modified Allen Test (MAT) include:
- Overextension of the wrist
- Contralateral ulnar compression by stretching of the skin
- Examiner error
- Inadequate patient cooperation
- Subjective interpretation of the color
How to perform original Allen’s Test (AT)
- Explain the procedure to the patient.
- Obtain verbal consent.
- Ask patient to elevate his or her both hands above the heart level for 30 seconds.
- Patient is then advised clench the fists tightly. Both these steps help to drain the blood from hands.
- The examiner then occludes the both the radial arteries simultaneously for few seconds and ask the patient to open his or her hands. Patient’s palms will look whitish and blanched if the arteries were well occluded.
- Then, observe the time it takes to return to normal color which indicates the level of collateral blood circulation
- See interpretation of Allen test
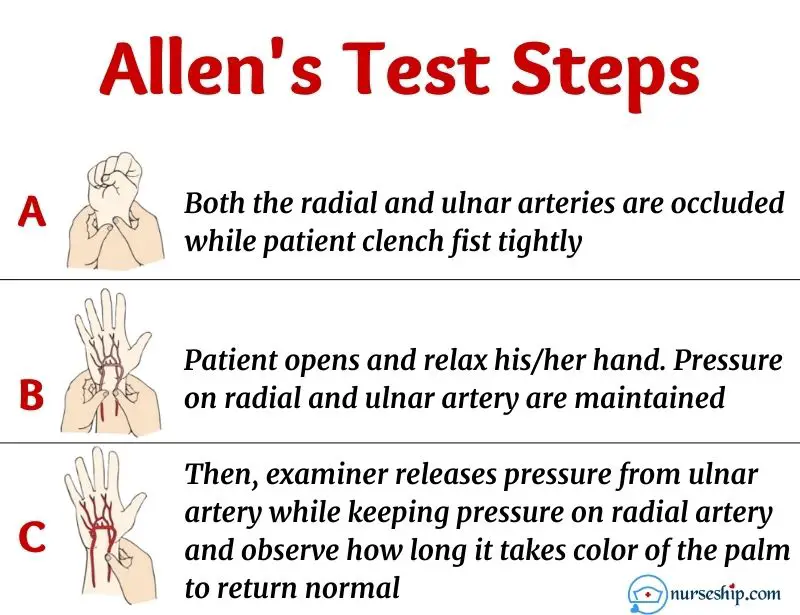
How to perform Modified Allen’s Test (MAT)
- Explain the procedure to the patient.
- Obtain verbal consent.
- Palpate and locate both the radial and ulnar arteries.
- Ask patient to make fist tightly and elevate hand by flexing from elbow. Alternatively, patient can close and open fist for couples of times to increase blood drain from hand.
- Next, compress ulnar artery and radial artery simultaneously with your thumb or fingers [whichever way is comfortable for you – important thing is the pressure should be enough to block the blood flow].
- Patient is then asked to open and relax his/her hand. Hand should appear whitish and blanched.
- The examiner, then releases pressure from ulnar artery while keeping pressure on radial artery. Then observe how long it takes color of the palm to return normal. If the color returns normal within 5 seconds indicates normal collateral blood circulation of the ulnar artery.
- Document the findings.
Difference between original Allen test (AT) and modified Allen test (MAT)
| Original Allen Test (AT) | Modified Allen test (MAT) |
| Performs on both hands simultaneously by occluding radial arteries first and repeats the procedure by occluding ulnar arteries as well. | Perform on one hand at a time by occluding both the radial and ulnar arteries together. Then, releasing pressure off the ulnar artery to check collateral blood circulation. |
Interpretation of Allen test results
False-positive and false-negative results are quite common while interpreting Allen test findings due to its qualitative nature of interpretation. Additionally, there is no consensus regarding the best time limit for a positive result.
So, remember to check your institution’s guidelines for normal ranges of Allen’s test.
Following are the most commonly reported normal ranges for Allen’s test in the literature.
- Normal – palm’s color returns to normal less than 5 seconds
- Intermediate – palm’s color returns to normal between 5 to 10 seconds
- Abnormal – takes more than 10 seconds to return to normal color of the palm
Positive Allen Test vs Negative Allen Test
A description of the positive Allen test and negative Allen test are tabulated according to the World Health Organization’s (WHO) guideline.
| Positive modified Allen test | If the hand’s normal reddish-pinkish color returns within 5 to 15 seconds of releasing occlusion on the ulnar artery indicates that it has adequate collateral blood flow. This is considered a positive Allen test. |
| Negative modified Allen test | If the hand’s normal reddish-pinkish color DOES NOT return within 15 seconds of releasing occlusion on the ulnar artery indicates that the ulnar artery’s blood flow is inadequate or nonexistent. Which is considered as a negative Allen test. |
A positive Allen test means the ulnar artery is capable of adequately perfusing the hand even without the radial artery’s circulation. So, in case of injury to the radial artery due to a procedure or surgery, there is no risk of ischemia to the hand.
On the other hand, a negative Allen test means the ulnar artery DOES NOT provide adequate blood circulation to the whole hand. Therefore, in case of a negative Allen test, you must avoid the procedure to the radial artery and repeat the Allen test on the opposite hand.
If the Allen test on both hands is negative, more advanced methods such as doppler should be done to confirm the patency of the arteries before any procedure or surgery.
Meanwhile, you can use another artery such as the femoral artery for the procedure such as ABG sample collection.
Reverse Allen’s Test
The Reverse Allen test assesses the radial artery’s patency and ability to adequately perfuse the hand in the event of ulnar artery damage.
Basically, the procedure for Allen Test and Reverse Allen test is the same. The only difference is Allen test checks the patency of the ulnar artery and the reverse Allen test checks the patency of the radial artery.
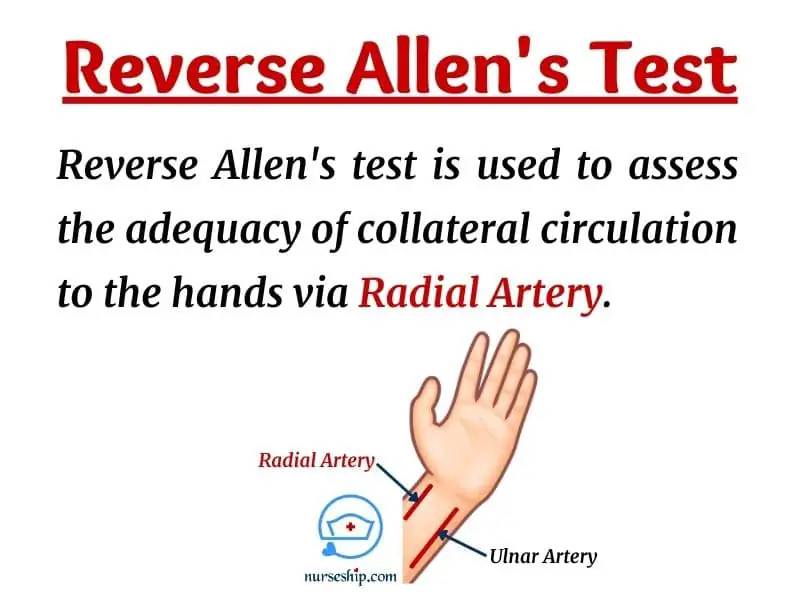
How to perform Reverse Allen’s Test
The procedure for the reverse Allen test is the same except this time you occlude the ulnar artery and releases the pressure on the radial artery. Then observe for the time it takes to return to the hand’s normal color.
The result of the reverse Allen test is interpreted the same as the Allen test.
Conclusion
The Allen test (AT) and modified Allen test (MAT) is a physical examination performed to evaluate the capability of collateral blood flow to the hand via the ulnar artery.
While the reverse Allen test assesses the adequacy of the radial artery to supply blood to the hands.
These are simple and quick methods of determining the patency of the blood vessels in the hand. Thereby, reducing the risk of ischemia of the hand due to lack of blood flow.
Another similar method of assessing vascular patency of the hands is the Barbeau test.
CLICK HERE to learn the technique and classification of the Barbeau test.
Reference
Curtis, K., Ramsden, C., Considine, J., & Fry, M. (2019). Emergency and Trauma Care for Nurses and Paramedics (3rd ed.). Elsevier Health Sciences.
Freshwater, L., & Cairo, J. (2014). Workbook for Mosby’s Respiratory Care Equipment (9th ed.). Elsevier Mosby.
Hargrove-Huttel, R. A. (2005). Medical-surgical Nursing (4th ed.). Lippincott Williams & Wilkins.
Kauffman, M. (2014). History and Physical Examination. Jones & Bartlett Learning.
Lippincott’s Nursing Procedures. (2009). Lippincott Williams & Wilkins.
McCall, R., & Tankersley, C. (2004). Phlebotomy Exam Review (2nd ed.). Lippincott Williams & Wilkins.
Topol, E., & Teirstein, P. (2011). Textbook of Interventional Cardiology (6th ed.). Elsevier.